백엔드 연동하기
기본동작 따라하기 에서는 직접 브라우저를 통해 정보를 URL에 입력하였다. 하지만 엔터프라이즈 서비스에서 정보의 대부분은 백엔드에 존재하고 프론트엔드까지 정보가 노출되는 과정도 별도의 개발 또는 API 연동을 필요로 한다. render 함수의 외부 API {{ ext }} 기능을 통해 정보가 실시간으로 이미지에 반영된다면 보다 높은 생산성을 제공할 수 있다.
1. 백엔드 API 연동하기
기본동작 따라하기 예제를 백엔드 API를 이용해 단계별로 만들어 본다.
1.1. 백엔드 API 호춡 테스트
기업정보(회사명, 로고, 설립년도 등)를 제공하는 API가 M2 가 설치된 환경에서 정상적으로 호출되는지 테스트한다.
다음과 같이 정상적으로 JSON 형식의 데이터가 제공된다면 성공이다.
{
   "name": "apple",
   "img": "https://upload.wikimedia.org/wikipedia/commons/thumb/8/8a/Apple_Logo.svg/136px-Apple_Logo.svg.png",
   "slogan": "Think Different.",
   "founded": 1976,
   "stockprice": 164.90,
   "employees": 147000
}
1.2. banner.html 개선하기
이전 장의 banner.html 은 모든 정보가 클라이언트에게 노출되어 URL로 입력되었다.
백엔드 API를 이용하는 버전을 사용하면 더욱 간결하게 동일한 결과를 얻을 수 있다.
# 기존 logo 변수를 삭제, 회사명을 company로 입력한다.
http://{server-ip}/banner.html/render/args/company=apple
사용할 백엔드 API는 <link> 태그로 참조된다.
<link ref="external" href="https://demox.winesoft.co.kr/demo/assets/api/{{args.company}}" name="company">
위 선언은 클라이언트 호출에 따라 아래와 같이 해석된다.
<link ref="external" href="https://demox.winesoft.co.kr/demo/assets/api/apple" name="company">
API 호출결과는 company 변수에 바인딩되어 아래와 같이 참조된다.
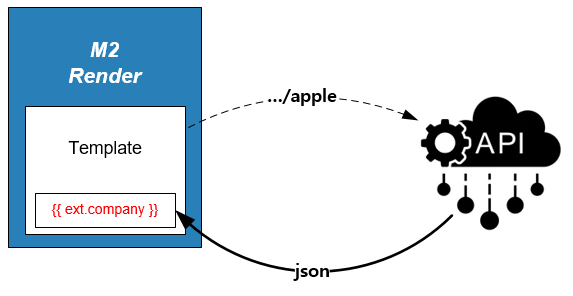
<h1>{{ext.company.name}}</h1>
{{ext.company}} 를 이용해 개선된 banner.html 은 다음과 같다.
<html>
   <head>
      <link ref="external" href="https://demox.winesoft.co.kr/demo/assets/api/{{args.company}}.json" name="company">
   </head>
   <body style="background-color: {{args.bgcolor}};">
      <div style="width: 480px; height: 240px; text-align: center; vertical-align: middle;">
         <br>
            <img src="{{ext.company.img}}" height="100">
         <br>
         <h2>{{ext.company.name}}</h2>
         <h3>{{ext.company.slogan}}</h3>
      </div>
   </body>
</html>
회사명만을 URL에 노출하여 형태로 기업정보가 반영된 이미지를 생성할 수 있다.

2. 멀티 백엔드 연동하기
2.1. 배열 참조하기
다음과 같이 간단하지만 각각의 기업정보를 참조해야 하는 경우를 만들어보자.
먼저 구성하려는 기업의 이름을 각각 변수로 할당하는 방법이 있다.
http://{server-ip}/banner.html/render/args/company1=apple;company2=google;company3=amazon;

# 위 호출에 대응하려면 <link> 가 아래와 같이 전용으로 각각 대응되어야 한다.
<link ref="external" href="https://demox.winesoft.co.kr/demo/assets/api/{{args.company1}}" name="company1">
<link ref="external" href="https://demox.winesoft.co.kr/demo/assets/api/{{args.company2}}" name="company2">
<link ref="external" href="https://demox.winesoft.co.kr/demo/assets/api/{{args.company3}}" name="company3">
전혀 아름답지 않다.
render 함수는 보다 우아한 표현을 제공한다.
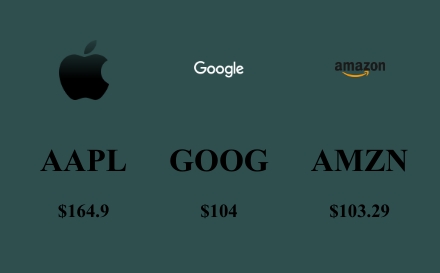
http://{server-ip}/banner.html/render/args/company=[apple,google,amazon]
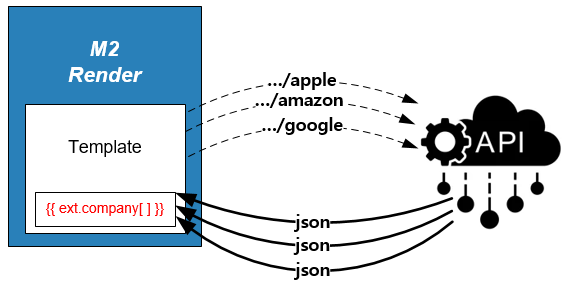
배열 형식으로 입력하는 것만으로 <link> 에 선언된 API를 멀티로 호출한다.
템플릿은 수정할 것 없이 데이터 참조만 배열로 바꾸면 입력된 순서대로 표현 가능하다.
<html>
   <head>
      <link ref="external" href="https://demox.winesoft.co.kr/demo/assets/api/{{args.company}}.json" name="company">
   </head>
   <style>
      table {
            border:0px;
            padding: 10px;
      }
      th, td{
            border: 0px;
            padding: 20px;
            width: 180px;
            text-align: center;
      }
   </style>
   <body style="background-color:DarkSlateGray;">
      <div style="height: 240px; text-align: center; vertical-align: middle;">
         <table>
            <tr>
               {% for company in ext.company %}
                  <td><img src="{{company.img}}" width="50"></td>
               {% endfor %}
            </tr>
            <tr>
               {% for company in ext.company %}
                  <td><h1>{{company.stock.ticker}}</h1><h3>${{company.stock.price}}</h3></td>
               {% endfor %}
            </tr>
         </table>
      </div>
   </body>
</html>
2.2. 이미지 가변폭 제어
입력 개수에 따라 이미지 크기가 변동될 수 있다.
http://{server-ip}/banner.html/render/args/company=[apple]
위와 같이 apple 만 입력하면 아래와 같이 하나의 배너가 생성된다.

조금 더 나은 레이아웃을 위해 템플릿을 아래와 같이 수정한다.
<html>
   <head>
      <link ref="external" href="https://demox.winesoft.co.kr/demo/assets/api/{{args.company}}.json" name="company">
</head>
   <style>
      table {
            border:0px;
            padding: 10px;
      }
      th, td{
            border: 0px;
            padding: 20px;
            width: 180px;
            text-align: center;
      }
      </style>
   <body style="background-color:DarkSlateGray;">
      <div style="height: 240px; text-align: center; vertical-align: middle;">
         <table>
            <tr>
               {% for company in ext.company %}
                  <td><img src="{{company.img}}" width="50"></td>
               {% endfor %}
            </tr>
            <tr>
               {% for company in ext.company %}
                  <td><h1>{{company.stock.ticker}}</h1><h3>${{company.stock.price}}</h3></td>
               {% endfor %}
            </tr>
         </table>
      </div>
   </body>
</html>
2.3. finance.yahoo.com 연동하기
우리가 이용하는 API의 주가는 엉터리이다.
https://finance.yahoo.com/ 의 라이브 주가를 반영하면 어떨까?
분명 더 신선한 이미지로 고객에게 어필할 수 있을 것이다.
https://query1.finance.yahoo.com/v8/finance/chart/{symbol}?range={range}&interval={interval}&indicators={indicators}&includeTimestamps={includeTimestamps}
{symbol}주식 종목. ticker (예: AAPL, GOOG, AMZN 등)
{range}데이터 기간 (1d, 5d, 1mo, 3mo, 6mo, 1y, 2y, 5y, max 등)
{interval}시계열 데이터 간의 간격 (1m, 2m, 5m, 15m, 30m, 60m, 1d 등)
{indicators}보조 지표 (옵션)
{includeTimestamps}타임스탬프를 포함할지 여부 (
true또는false)
M2가 설치된 서버에서 다음 API를 호출하여 결과를 정상적으로 얻어내면 성공이다.
https://query1.finance.yahoo.com/v8/finance/chart/aapl
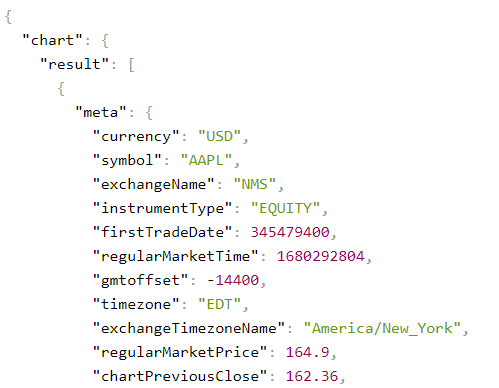
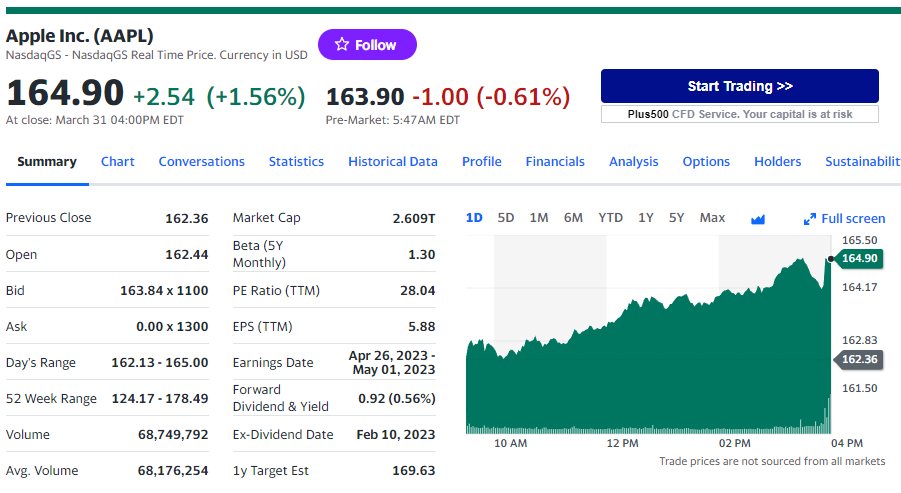
apple 주가정보
setting.json 에서 proxy 함수를 활성화하여 mybanner.com 이 query1.finance.yahoo.com 를 호출할 수 있도록 허가한다.
{
   "hosting": [
      {
         "name": "mybanner.com",

         ... (생략) ...

         "functions": {
            "network": {
               "proxy": {
                  "meta" : {
                     "enable" : true

   ... (생략) ...
}
Note
다음과 같이 query1.finance.yahoo.com 가 별도의 가상호스트 존재한다면 proxy 함수를 활성화하지 않아도 된다.
{
   "hosting": [
      {
         "name": "mybanner.com",
         ...
      },
      {
         "name": "query1.finance.yahoo.com",
         ...
      }
   ]
}
참고해야할 가상호스트가 같은 서버에서 호스팅된다면 로컬로 라우팅된다.
2.4. API 연동
https://query1.finance.yahoo.com 호출을 위해서는 {{symbol}} (=ticker) 이 필요하다.
http://{server-ip}/banner.html/render/args/company=[apple];symbol=[aapl]
파라미터가 추가되는 방식은 유연성이 떨어지며 향후 템플릿 작성도 번거롭다.
다행히 각 기업의 정보에 {{symbol}} 로 사용할 수 있는 ticker 가 존재하는 것 같다.
{
   "name": "apple",
   ...
   "stock": {
      "ticker": "AAPL",
      ...
   }
   ...
}
위 값을 이용하여 야후 API를 호출하도록 <link> 를 한줄 더 추가한다.
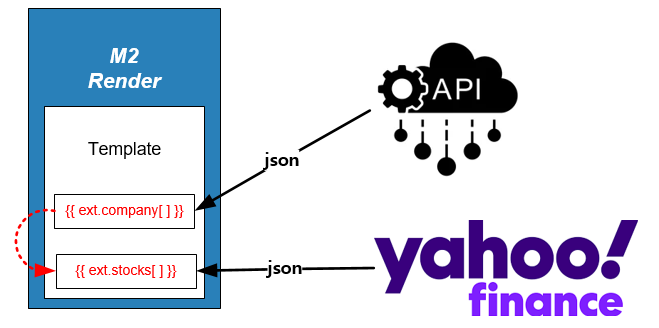
{{ext.stocks[]}} 는 {{ext.company[]}} 에 의존성을 가진다.
<link ref="external" href="https://demox.winesoft.co.kr/demo/assets/api/{{args.company}}" name="company">
<link ref="external" href="https://query1.finance.yahoo.com/v8/finance/chart/{{ext.company.name}}" name="stock">
이제 아래와 같이 기존 URL 형식을 유지하면서도 실시간 주가를 이미지로 구현할 수 있다.
http://{server-ip}/banner.html/render/args/company=apple
http://{server-ip}/banner.html/render/args/company=[apple,google]
http://{server-ip}/banner.html/render/args/company=[apple,google,amazon]